Friday, March 26, 2010

Geo Search Your Map

ZeeMaps now supports a powerful GeoSearch feature: search for all entries in a geographical area.

For example, you can search for all entries in California, using the search term "california", or all entries with the name "Systems" in California, by issuing the search "systems, california".

GeoSearch is available for both published maps, and maps on the ZeeMaps server.

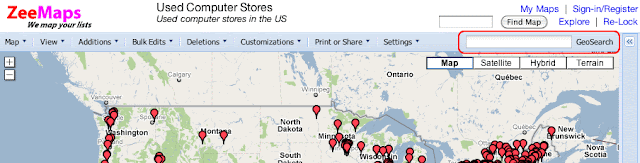
For example, here's a published map of used computer stores in the US. Use the the input field at the bottom of the map for GeoSearches.


On the ZeeMaps server, a similar input field appears to the right top of your map.


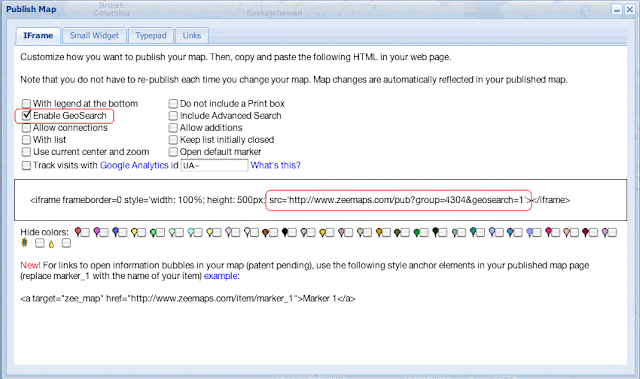
To enable GeoSearch on your published map, please add the parameter "&geosearch=1" to the "SRC" attribute of your IFRAME code. You can also get a new HTML for your published map, with the
checkbox "Enable GeoSearch" selected in the Publish dialog.


Friday, March 05, 2010

Published Maps: Google Ads, White Label


Remove Google Ads from your published maps in one of two ways:
  1. Subscribe individual maps, or
  2. Create a subscription group for all maps to be published on a single website.
For the first case, use the Map -> Subscribe menu item.

For the second case, create a subscription group and then add your maps to the subscription group. To create a subscription group, sign-in to ZeeMaps and then use the Account  link at the bottom of your map page to create a new subscription group.


In the subscription group, enter the base URL for your website. Select a six month or twelve month term and click on the New Subscription button to create the subscription group. Once the subscription group is created, use the Map -> Subscribe menu item on your map to get the subscription dialog. Then, select the newly created subscription group and add your map to the subscription group.


In either case, you can also select the White Label checkbox to publish your maps without ZeeMaps branding.

Sunday, February 28, 2010

Charge for Power Functions

In order to continue providing a reliable, scalable mapping service, we have to start charging for certain power functions:
  • Bulk Edits (Annotations, Markers, Regions)
  • Delete ALL Markers, Delete Some Markers
A fully functional ZeeMaps remain free. Non-power users can edit or delete individual markers, annotations, or regions.

If you need to use the power functions, please sign-in to ZeeMaps, and upgrade your account using the Account link at the bottom of your map or My Maps page. You can pay for three ($9.95/month), six ($7.95/month), or twelve ($6.95/month) months at a time.
      
Use the Upgrade button in the Accounts dialog box to make your payment through PayPal.

Once you upgrade the power functions will be activated for all your maps.

Google Ads will not show on the ZeeMaps server for power users. The ads may still show on your published maps, which you can remove using the "Map->Subscribe" menu item.

Tuesday, February 16, 2010

Automatic Updates from Google Spreadsheet

ZeeMaps has the ability to directly import data from your Google Spreadsheet on your map. To upload a Google Spreadsheet, use the Additions -> Upload CSV menu item. In the resulting dialog box, click on the link that says "Use Google Spreadsheet xxxx".


Make sure that:
  1. Your spreadsheet is named ZeeMap-xxx, where xxx is your map number. For example, if your map number is 306, the spreadsheet should be named ZeeMap-306.
  2. The user zeemaps@gmail.com should have read access to your spreadsheet.
When you upload a Google Spreadsheet, in the confirmation dialog box (step 2 of the upload process), there is a checkbox at the bottom that says "Regularly update from Google Spreadsheet." If you check this box, then your changes to the Google Spreadsheet will be automatically reflected in your map.


Only row changes are supported, so you cannot change the columns of your spreadsheet. If you add or remove a column, then you must do another upload of the spreadsheet and then the updates will work properly.

We will be doing updates of the spreadsheets every four hours. Please let us know if you'd like to see the updates done more frequently.

Friday, February 05, 2010

Highlight Regions in Australia, Canada, China or USA

You can highlight regions of Australia (e.g., Victoria, Queensland), Canada (provinces), China (e.g., Hunan, Jiangshu) and USA (states, cities) on ZeeMaps. Use the Additions -> Highlight Region menu item and then select the appropriate country and state in the resulting Add Region dialog.

We support state-level region additions in Australia, China, Canada and USA. For USA we also support cities. You can also highlight regions at the country level for any country.

Tuesday, November 03, 2009

Moderate addition of map markers

For crowdsourced maps, you can moderate additions with our new "Pending Markers" feature. Use 'Customizations -> Add Marker Form -> New entries must be approved by Map Admins' to enable this feature on your map. (Make sure you have set an admin password for your map using Settings -> Privacy. ) Now, when a non-Admin person adds a marker on the map, it will not be added to the map automatically, but will be in a "Pending Approval" state. Map admins can check for such markers using "View -> Pending Approval". This will show all markers that are waiting to be approved. Admins can move, change or delete any of these markers, as you would edit a marker on ZeeMaps. Once you are satisfied with the remaining set of pending markers, use the menu items "Additions -> Approve Pending" to add them all to the map.
Preview Entries Before Committing

Preview your new map entries before committing to the map. In the Add dialog, after you have entered information about an entry, click on the Preview button. This will show you where the marker will be positioned, its color, and info bubble. Close this info bubble to close the preview. Once satisfied with your entry, click on the Submit button to commit and save the entry.

Monday, September 28, 2009

Reserve Marker Groups for Admin


With the new "Reserved Groups" capability of ZeeMaps, you can set up your map such that only users with Admin keys can assign markers to the "reserved groups." This can come in handy for crowdsourced maps, where you want to restrict certain marker groups as, e.g., Editor's Picks.

 To reserve a group of markers, use the Customizations -> Reserve Groups menu item to select the marker groups that you want to reserve.

Thursday, September 17, 2009

Issues with Safari browser

Sometimes, ZeeMaps functions do not work properly in Safari browser. The issue seems to be related to cookies, and we are working on resolving the issue. In the meantime, if you notice weird behavior with Safari, just delete your cookies from www.zeemaps.com and it should work fine after that.
Marker Groups and Sub-Groups

ZeeMaps now allows you to sub-group your markers. For example, suppose we have two major groups of markers: Schools and Hospitals. Rather than display all schools and hospitals as one long list each, we can define sub-groups for Schools, e.g., Kindergarten, Middle School, High Schools, and for hospitals, e.g., County Hospitals and Private Hospitals.

To create sub-groups, we use the same menu item as to create groups, i.e., Map -> Legend. This menu results in a tree display of all the available colored markers. We use the tree view to drag-and-drop our markers into a two-level hierarchy of groups and sub-groups.


The listing of the entries is now better organized with groups and sub-groups:

Sunday, September 13, 2009

Crime Maps

Crimes happen. Law-enforcement agencies across the country are engaging the public by disseminating local crime information. The agencies do this for two reasons: (1) knowledgeable citizens can help solve crimes that might otherwise go unsolved, and (2) people should be forewarned and avoid becoming accidental victims of violent crimes.

A list of crimes can be published in many ways, but a presentation on a map is the best way to get an overall sense of crimes in a neighborhood. That's where ZeeMaps steps in: we provide an easy way to publish a list of crimes on a map. We also provide a specialized search dialog to search for crimes within an area. In the following, we will walk-through the process of creating, publishing and searching a crime map.

 Creating a new crime map is simple in ZeeMaps: click on the "Create Crime Map" link on the home page. You will get a dialog box to enter information about the map, e.g., its name, the neighborhood for which you are building the map. It is a good idea to put an "Admin password" for the map so only users with this password can make changes to the map.


I have named my map "Crimes in our neighborhood." I've also given it an Admin password and set the starting location to San Francisco. Now when I hit the "Create" button, I get an empty map positioned in San Francisco.


Let's start populating this empty map with some made-up crimes.


Add Markers to Map


To add crimes, we have two choices: (1) we can add one crime at a time, or (2) we can upload a list from a spreadsheet.


Let's add one crime entry first. We do this by clicking on the menu item Additions on the menu bar above the map, and then selecting "Add Marker" from the resulting drop-down menu. This results in a dialog box for us to enter information about the marker.


The Add dialog has four tabs: (a) Location, (b) Information, (c) Media, and (d) Help. Use the Location tab to enter basic information about the crime, e.g., crime specifics, address and category. For the address, you can be as detailed as you want: enter a street address, cross-streets, or just the city. In case you do not want to give details of the location, you can use "Map Select a Location" to pin-point where you want to position the marker.

We fill out this form, including the Information tab and hit Submit.


Once we hit submit, we will see a marker added to the map for an Aggravated Assault crime category.


Uploading a list from a Spreadsheet


We will now add multiple markers at once, using data from a spreadsheet. We create a spreadsheet, with the columns "Name, street, city, postcode, category, case number, suspect, juvenille, date, time, and notes". We add rows for each of our crime entry. Finally, we save the spreadsheet as a CSV file, and upload it to our map using the "Additions->Upload CSV" menu item. We added four entries using this method and the resulting map is shown below.


Geocoding for Crime Location

ZeeMaps will find the best fit for a location based on the information that you supply in the spreadsheet. In case you want to override the location found by ZeeMaps, or do not wish to use the geocoding provided by ZeeMaps, you can also use latitude and longitude columns to specify your own latitude and longitude values.

Searching the Crime Map

Notice the "Search" button on the published map above. (We published the map using the "Print or Share->Publish" menu item.) You can click on the Search button to search for crimes marked on the map. For example, search for all "Aggravated Assault"'s in January. The result should be the one entry in the Tenderloin area of San Francisco.

Suspicious Activity Reports

It is easy to get users to submit suspicious activity reports and have them managed on the crime reports map. Map admins can moderate the entries so that they are published when approved.

Scalability

ZeeMaps is engineered to handle large datasets, so it can scale easily from a few entries to tens of thousands of entries. The scalability relates to both the performance of marker display as well as reducing visual clutter.
Tuesday, September 01, 2009

To speed-up maps with many entries, start map with no markers!

With a new feature in ZeeMaps, you can set your map to display with no initial markers. Use the menu item Settings->Display and then check the box that says

On initial map display, do not show markers that have a legend entry (Fast!)"

This will result in a map that does not show any markers initially when that marker belongs to a group with a legend value. The user can then click on the legend value at the bottom of the map, to see the markers belonging to that legend. In case there are markers with no legend value, they will still show up in the initial display.

For example, here's a map with over 1500 entries that displays fairly fast on initial display and then you can click on a legend value to see only markers belonging to a certain group.


For maximum effect, please note:
  • Each marker group (identified by a legend) should not have more than a couple of hundred markers
  • You should turn off marker clustering by using the Settings-Markers-Do not group markers close to each other
  • You may want to use smaller markers using the Settings-Markers-Use small markers